

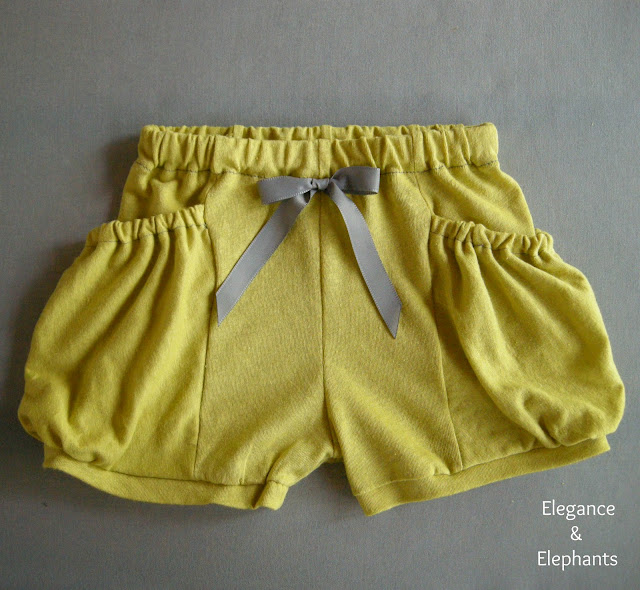
This week's project is a pair of little capris for Anja. I wanted to do something interesting with the pockets, so I put them on the bottom. While they are functional pockets, I know she won't be using them, but if she were to, I'd probably make these shorts rather than capris, to avoid bulk. However, this little girl's been scraping her knees way too much lately, so I wanted her to have something with some coverage on her legs.
Besides your fabric, you will need:
44cm (17") of 6mm (1/4") elastic
2.5cm (1") elastic for the waist (length depends on the size you are making)
one button
thread


Measure around leg to determine how wide/long you want the leg opening pieces to be.
Cut two pieces.


1. Fold and iron leg opening pieces in half.
2. Make an inverted pleat along the inside seam of leg.
3. Pin leg opening piece to leg.
4. Stitch.

1. Measure and cut back pocket. I adjusted mine to be 13 cm X 10 cm (3 1/2"X4").
2. Cut the upper pocket piece - 10cmX6cm (4"X2 1/2")
3. Stitch along pocket edge

1. Fold upper pocket piece and stitch along the sides
2. Gently pull bobbin thread of lower pocket piece, turn edges, and iron

**Baste upper edge of pocket piece**


Happy Sewing!


So cute! I love the gathers on the pockets.:)
ReplyDeleteThank you!
Deletethese are fabulous, what pattern did you use?
ReplyDeleteThank you! I didn't use a pattern...just made them as I described in the tutorial. If you're wanting to make some and need some clarification on any of the instructions, just let me know!
DeleteYes pls
DeleteFabulous! Thanks so much for the tutorial, off to pin it for shorts on the line!
ReplyDeleteSo cute!!!!
ReplyDeleteI cant reply to my post, but I managed a pair and they are fabulous! http://farm9.staticflickr.com/8425/7516997546_2ffc4b84cc_b.jpg thanks for a great tute.
ReplyDeleteOh my! Thank you for making my day! This is the first time I've seen one of my tutorials made into a garment by someone else. I think they turned out great! Thank you so much for sharing!
DeleteI love them, I picture them with some brown Mary Janes and a cute top for my 2nd grader. I will share another pic when the outfit is complete . Thanks for the tute
DeleteThanks for sharing this. I've been wanting to make my niece some shorts for a while and this tutorial really helped me out. I have blogged about the shorts I made and linked back to your tutorial. You can see it here http://ribbonsandbibbons.blogspot.co.uk/2012/07/more-shorts.html
ReplyDeleteLOVE them! I like how you used some contrasting fabric. Thank you so much for sharing these!
Deletethank for your tutorial ¡¡¡
ReplyDeleteHi I would love to know what type of fabric this is!!! Thanks
ReplyDeleteI'm not sure exactly what it is! But I do know it's 100% cotton...almost feels like linen, but a little rough. Sorry I'm not more help!
DeleteYou really do such lovely work! Thank you for sharing.
ReplyDeleteI am so impressed with all of your pieces--you are a fabulous designer and fantastic seamstress! I'm now following you since I've clicked on your links three times in a row :) These are, in a word, ADORABLE!
ReplyDelete[email protected]
Heidi - I simply adore these!!! They are being featured as one of the top patterns on SewSet today! Thanks so much for sharing!
ReplyDeletehttp://www.sewset.com/
Great tutorial! I have featured it on Craftuts
ReplyDeleteI wish I were as. Talented as you! I want to make everything on your blog! I'm so thrilled I accidently found this blog!!!
ReplyDeleteThank you for sharing this awesome tutorial. I just made one today for my girl.
ReplyDeleteI was totally thinking about this pattern today and making it longer for Frances and suzanne pattern flip. Guess I was on your same wave length. Great to know it works!
ReplyDeleteWith Love,
Scary
these are the cutest pants! Just to clarify, in that first instructional picture, is the fabric doubled? So, four pieces? I couldn't tell if they were cut on a fold or just doubled. Thanks for the tutorial!
ReplyDelete